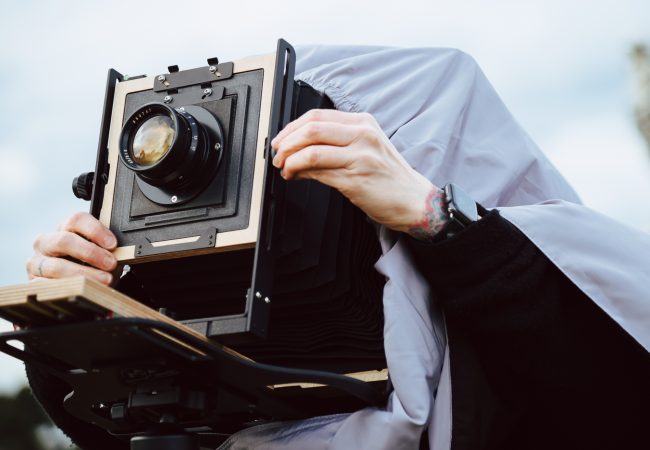
Intrepid cameras are interesting beasts. According to the company, they…

So What is Dye Transfer? by Andy Cross
Over the years I have been asked many times what is the dye transfer process and how does it work. Since writing the article for View Camera Australia Back to the Future I have received many more emails enquiring about the process.
My usual response has been just google the dye transfer process and you will find more information on the subject than you can read in a day. Many people have done that but often reply later “Yeah all very interesting but it doesn’t explain how it all actually works. “
So after asking David Tatnall whether writing a piece about the process in a manner most photographers and darkroom workers will be able to join the dots on I got the green light to put my fingers to the keyboard.
First of all the Dye Transfer process was not used very much by the wedding and portrait industry. Only the high end of that industry would entertain the idea of getting a wedding album or formal portraits printed that way.
It was used primarily in the commercial and advertising industry. In most cases DT was used to produce colour accurate final artwork which was then colour separated using half tone screens. These colour seps as they were known were used to make printing plates. These in turn were placed into a printing press and inked up to produce advertisements in magazines, brochures etc.
As a result the general public were never aware of this colour printing process or for that matter the process which DT replaced which was the tri-colour carbro process. This process was a lot more time consuming and difficult to get consistent results with. But before I get into how the DT process works I should back up a bit and discuss a little of the history.
Originally Kodak developed this dye imbibition process (which comes from the fact the dyes are imbibed within a metallic salt in the papers emulsion ) which at the time was known as the wash off relief process. In about 1945 they hired a chemist Louis Condax to improve the process and along with collaboration from Bob Speck it was re-released as the dye transfer process in 1946.
This printing process although developed quite separately from the Technicolor process ( which was used to print motion pictures ) shared a number of similarities except the final substrate for motion pictures had to be a film base and not paper. If you do a web search for the Kodak Dye Transfer process you will find a lot of downloadable information about it. One of those publications is the Kodak E80 manual.
Much of this information is of a technical nature and in order to appreciate it the reader needs to have a good understanding of corrective silver masking, colour separation theory and sensitometry. At the height of this process’s use there were several ways in which a DT print could be produced. You could begin with either a masked or un-masked colour negative or a colour transparency. ( An un-masked colour negative is an early type of negative that doesn’t incorporate the orange/brown stain in it ) See Image #1 #2 A colour transparency or colour tranny is also known as a colour slide. A third way is to use colour separations made directly from the subject.


These days most photographers will be familiar with the term colour space. Well this isn’t a new term. Colour printers have been locking horns with it for longer than most of us have been alive. In this case you will find that the colour space the dye clouds of a colour film works in are not the same as those of the dyes suitable for printing. On a motion picture set, when shooting direct colour separations on a three strip camera, a person with the title of colourists was employed to minimize the colour reproduction issues. Another issue when working from a colour tranny is that it has too much contrast to be able to be reproduced on paper.
In order to correct for this, colour corrective and contrast reduction silver masking was employed to filter out or block the offending colours and reduce the contrast to manageable levels. This is done by contact printing the image onto a special film, made by Kodak called, Pan-Masking film. This film was exposed using the appropriate filtered light and processed to the correct level of contrast.
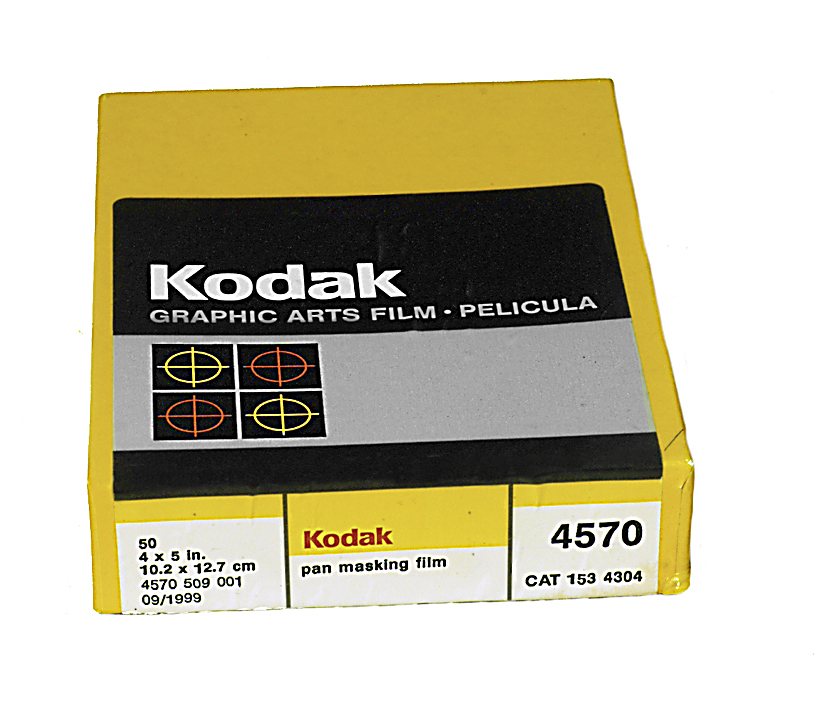
At this point I will make reference to some illustrations. Image #3 is a photograph of a box of now discontinued Kodak Pan Masking film. It was essentially the same emulsion as Kodak Panatomic X but without the anti-halation layer on the back. This allowed the film to be exposed through the back. By facing the emulsions away from one another the resulting mask would be made un-sharp. It was essential to make them un-sharp to avoid diffraction lines occurring. The same lines that appear in Photoshop when too much un-sharp masking is applied. These days darkroom workers use Ilford Pan – F as a masking film with a spacer sheet of fixed out film between the original and the film.


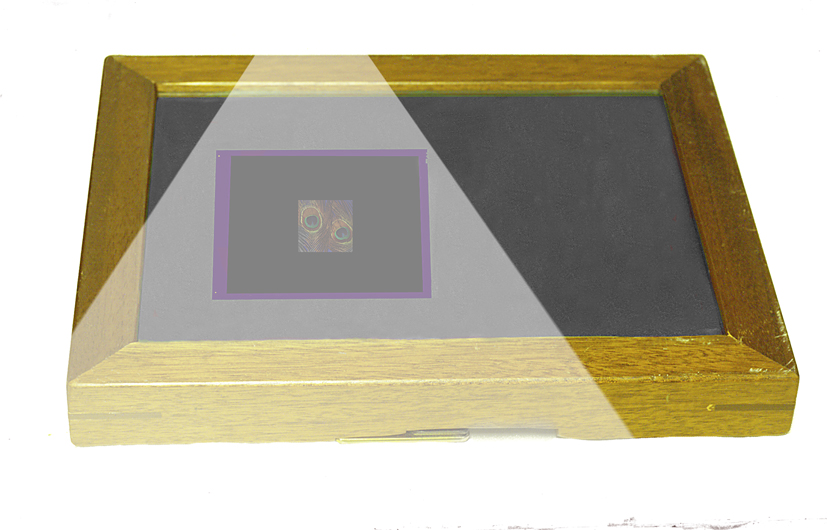
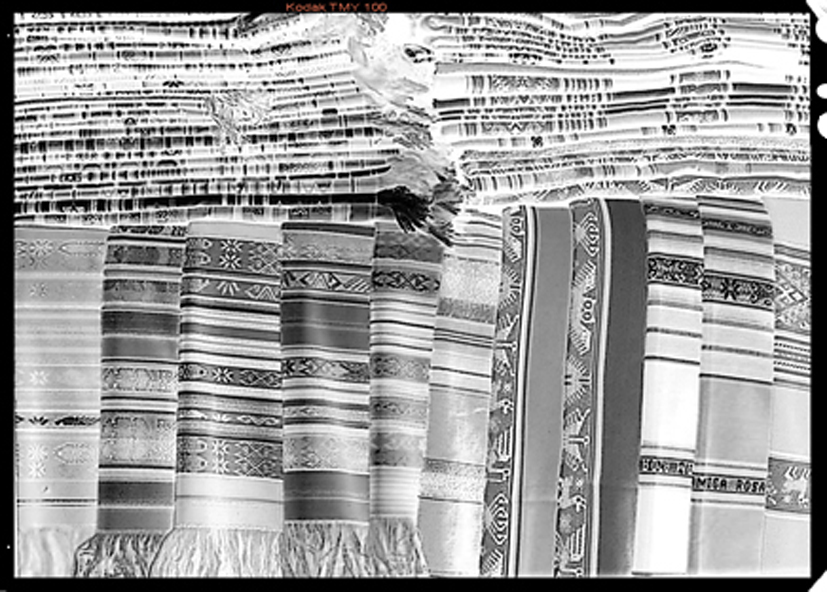
Images #4 #5 and #6 are graphical illustrations of contact printing a colour transparency onto three separate sheets of Pan Masking film. The colour image is first register punched then each sheet of masking film is punched before exposure. This allows the masks and original to remain in register after processing. The exposures are made using the appropriate filter over the enlarger lens. Usually the filters for the colour correcting mask are different than those for exposing the separations later on. Images #7 #8 are what the real colour corrective masks of the peacock feathers look like. Essentially where there is a silver deposit the mask will block that colour.


A white light exposure is also made to correct for excessive contrast. This white light mask is registered with the red CC mask and original colour image when making the red colour separation negative and again with the green CC mask when making the green colour separation negative. Only the white light mask is combined with the colour original when making the blue colour separation negative. The reason being is that the largest error between the dye in the original and those used for printing exists in this part of the spectrum.
These masking techniques are the bare minimum basics that are required. If there are important highlights with pale pastel hues in them that need careful reproduction or specular highlights that must remain specular then further masks have to be made. Because you can only stack three pieces of film on top of one another when making the separations the information in these other masks has to be built into the final CC and CRM masks. It becomes rather involved.If the masks have been made with the correct filters, exposed and processed to the correct density range and contrast, which are checked with a densitometer, See image #9. They can be registered with the original and then the combined masks and transparency used to make a colour and contrast corrected set of colour separation negatives. Different filter sets are required for different colour films.

This process is again a contact printing operation. T-Max 100 ISO film, which was originally developed for the purpose of making colour separations is the preferred film. Until T-Max came onto the scene Kodak Super XX film was used. The introduction of T-Max films saw Panatomic X, Pan-Masking film, Super XX and type one and two colour separation film disappear. Processing T-Max 100 to a lower gamma allowed it to be used for pictorial use in camera as well.
To make the colour separations the original colour transparency is placed on the registration pins of the contact printer emulsion to emulsion with the T-max . The unsharp CC and CR masks are placed on top of the transparency. Again the appropriate set of separation filters are used for the particular emulsion being separated. They are made sequentially usually starting with the red exposure. Two more sheets are punched and the green and blue exposures are made.
One corner is cut from the green separation negative and two from the blue so they can be identified later on. The T-Max isn’t equally sensitive to all colours of light so the exposures have to be staggered to accommodate this. Consequently the processing times have to alter as well in order to match up the contrast of each. Images #10 #11 #12 have been scanned from a real set of colour separation negatives used to make a dye transfer print.

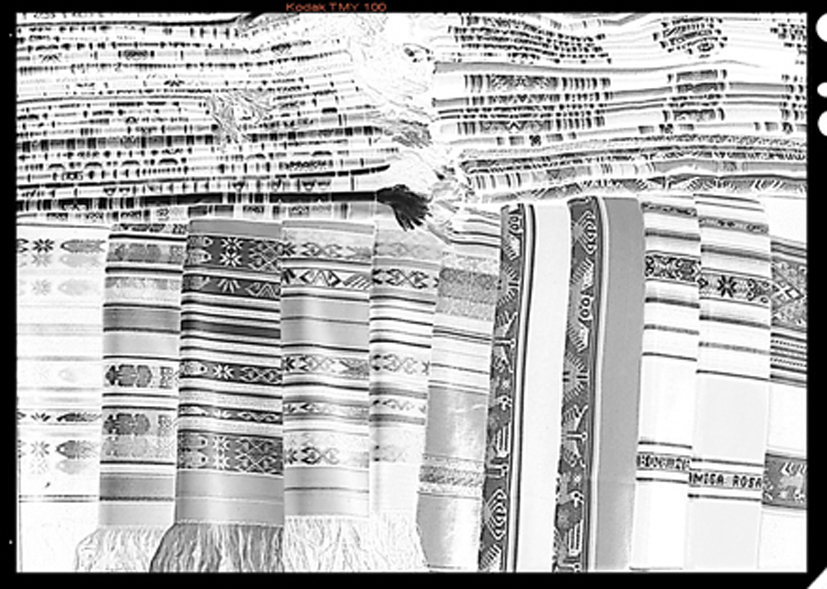
They are called colour separations because each colour in the original is split into varying densities of grey across three sheets of film. Just as a red filter on your camera darkens a blue sky and a green leaf by absorbing blue and green light it also brightens the red rose. Ok take this effect to a more extreme level with the use of quite dense red, green and blue filters. Sometimes called narrow band width or narrow cut filters. You finish up with negatives that print like the images you see in the channels palette of Photoshop because that’s what the channels are. Colour separations.
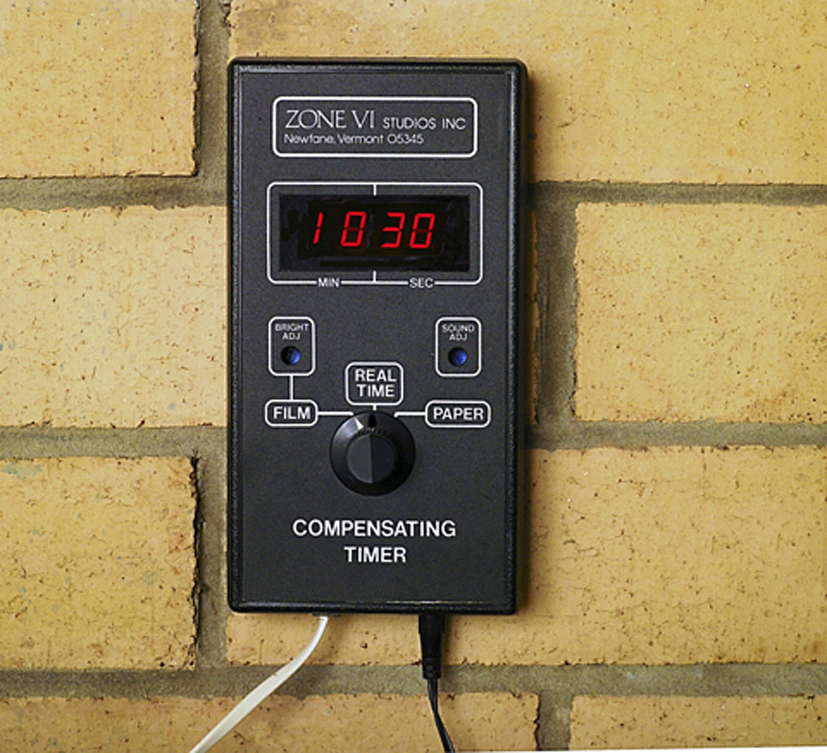
If all these processes are carried out correctly the end result will be a set of balanced colour separation negatives suitable for the process you intend using them for. The negative density range and contrast required will vary a lot from one colour printing process to another. A compensating developing timer is used to monitor the processing of these negatives as well as masks. See image #16.
From this point it becomes an enlarging process. The holes punched in the negatives now fit a matching set of pins in the negative carrier of the enlarger. See image #13 This allows each image to be projected onto the same place each time on the easel. A special easel called a vacuum easel has a set of larger pins attached to it. See Image #14. Holes are then punched into the matrix film using a Kodak register punch. See Image #15.


The vacuum easel is necessary, especially on larger sizes of film, to ensure each piece is lying perfectly flat. If one or two pieces have any air trapped underneath them the image may be sitting proud by a couple of thousandths of an inch. These images would be a slightly smaller size in the center to edge and would never register. The film punch for the easel uses larger elongated pins compared to the contact printer. This allows for variations in the dimensional stability of the materials being placed over them. See image #14.
With the red colour separation on the pins in the negative carrier a sheet of special film called matrix film is punched and placed emulsion down on the easel and the vacuum turned on. Yep the material is exposed through the base. If it weren’t only the deepest shadow region of the negative would be fully anchored to the film base. In the following stages of wash off the entire image would wash off the film leaving the shadows only.
The matrix film is only a blue sensitive ido-bromide emulsion and can be handled under red safelight. Once exposed it is processed in a severe form of pyro. This hardens the gelatin proportionately based on the exposure received. This hardening process is vital in producing the relief image necessary to absorb the dyes later on. I reserve an enlarger lamp specifically for exposing masks, separation negatives and matrices. That way I can keep track of the colour temperature and intensity of the lamp. I also employ an electronic shutter on the enlarger lens to avoid bulb ramping.
The processing of these large sheets of very expensive film is critical. It has to be even and consistent across all three sheets. The processing time and temperature is critical. Remember it is film not paper and does not get processed to completion like a B&W print. If one sheet gets slightly push or pull processed it will result in a colour shift in the final print. To monitor this closely a compensating developing timer is used. See Image #16 Usually the red separation negative is exposed and processed first. No stop bath is used just a water rinse because the by-products from pyro developers will often react with the acetic acid in the stop bath which results in chemo luminescence. A shimmering light will come from the tray which happens to be a frequency of light the matrix film is sensitive to. Allah fog. So if you have ever had some strange fogged results from negatives processed in a tank when using a pyro formula this could be why.
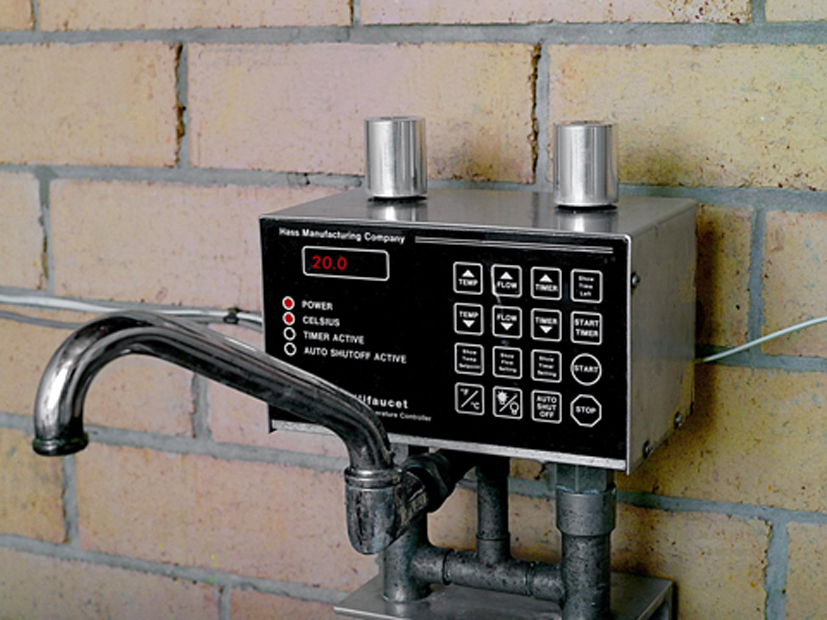
After fixation which usually has to be done in sodium thiosulphate, because the ammonium salt can further harden gelatin, the matrix film is given a hot water wash off. This removes the unexposed and unhardened gelatin. Too hot and the gelatin can blister. Too cool and there will be residual non-image forming gelatin left on the matrix. An accurate water temperature mixing valve is required to get consistency. See image #17
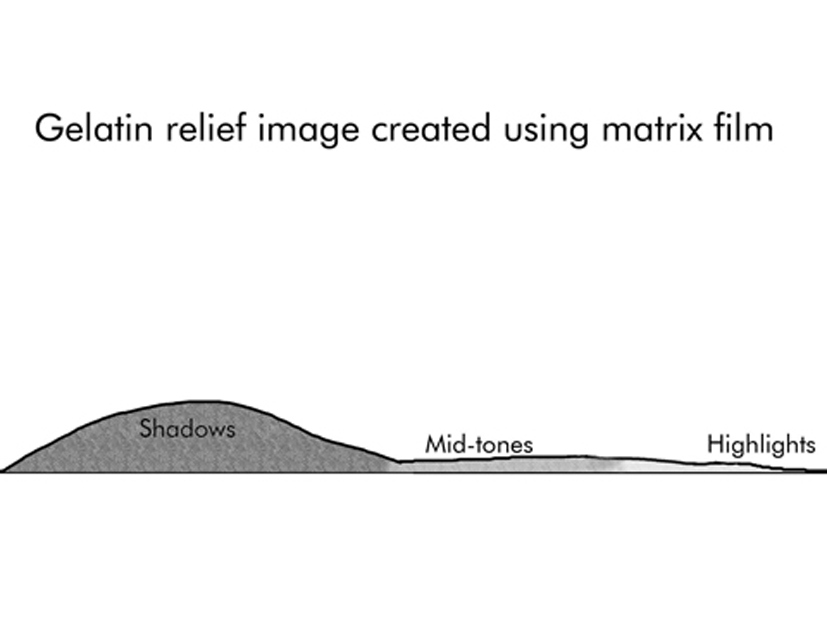
When dried the film contains a silver image but it is also a relief image. See image #18. The thick gelatin is able to absorb more dye than the thin gelatin. The mountains are the shadows while the valleys are the highlights. The mid-tones are the slopes in between.
This procedure is repeated by exposing the green separation negative to another sheet of matrix film followed by the blue and the whole dog and pony show repeated. Just as was done with the separation negatives one corner is cut from the green matrix and two from the blue. This is to prevent you soaking the matrices , as they are called, in the wrong dye bath.
You would think with a balanced set of separation negatives, that is three negatives with the same density range and contrast, would result in the exposure times when enlarging them onto matrix film would be the same. In fact the exposures have to be staggered so that the matrix exposed from the red negative receives the least exposure the one from the blue negative the most with the green somewhere between the two. This becomes the standard matrix exposure ratio.
But why ? It all comes down to the density of the printing dyes. The printing is done subtractively using yellow, magenta and cyan dyes just as an inkjet printer does. The matrix from the red negative gets soaked in cyan dye which is the complimentary opposite colour to red. The matrix from the green negative is soaked in magenta dye and the matrix from the blue negative soaked in yellow dye.
Because there is such a large difference in the printing densities between the dyes there needs to be a lot more yellow than any other dye a lot less cyan with the magenta being somewhere between the two. This ratio will vary between different types of matrix film, dye sets and contrast of the dyes.
With a correctly exposed set of matrices the dying up and transferring can begin. The matts are immersed in their respective dye baths agitating regularly for approximately 7 minutes. The gelatin needs to absorb as much dye as possible.
They are then drained and given a 1% acetic acid rinse. This is to remove any excess dye clinging to the surface. See Images #19 and #20. This is called the first acid rinse. This rinse can also have various chemicals added to it like highlight reducer , density reducer or additional acid and dye to increase density and saturation.
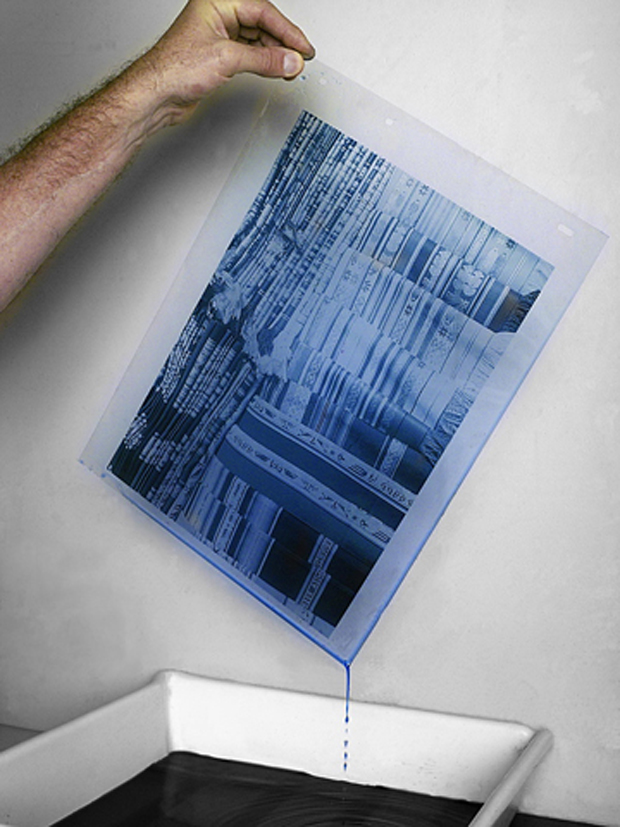

The rinsed matrix is then transferred to the second acid rinse which is sometimes called the holding bath. At this point a piece of specially prepared receiving paper is laid down on the rolling platen. Although I still have a stock of Kodak receiving paper most printers these days have to prepare their own. A sheet of conventional fiber based gelatin silver paper which has been previously fixed out washed and dried is then mordanted.
A mordant is a metallic salt that will combined chemically with an organic dye. Not many inorganic compounds will react with dyes this way. If you have ever tried dying a silver coin you will know what I mean. When a dye combines with a mordant a new insoluble compound is formed which are known as lakes. These lakes preserve the colour gamut of the dye whilst giving it the stability of a metal. This is why dye transfer is considered to be a non-fugitive colour printing process by image conservationists.
One of the failings to CMY dyes is that most of the cyan’s are too blue and not green enough. The magenta’s are too red and not blue enough. While the yellow’s are spectrally not too bad. It’s just that they are not dense enough to block enough of anything. Although the CC masking can filter out many of these arrastre’s the correct mordant will trim as much as well. Printers will notice that the cyan dye deposit when transferred will look a lot more turquoise on the paper than it did in the matrix. Similar shifts occur with the other colours as well.
The paper is soaked in a suitable mordant then allowed to dry. A hour before use the paper is placed in a conditioning bath. This softens the gelatin and brings its pH into line where it is receptive to the dye.
The rolling platen, which is usually granite, has a set of matching pins attached to it and the paper is positioned as close to the pins as possible. The dyed and rinsed matrix is then placed over the pins and rolled out in contact with the paper.
The most heavily dye laden matrix is rolled down first. In something like a sunset image it could be the yellow matrix. This is because there is a limit to the amount of dye the paper can absorb. If there is less cyan dye to be transferred then it makes sense that it should be the last colour to be transferred.
It takes about 7 minutes for the dye in the matrix to transfer to the paper. What causes the dye to transfer is largely due to the difference in the iso-electric points between the gelatin in the matrix and that of the paper. The higher it is in the matrix and lower it is in the paper the more readily the dye transfers. Other contributing factors are the pH of the dyes in relation to that of the paper and the type of mordant used.
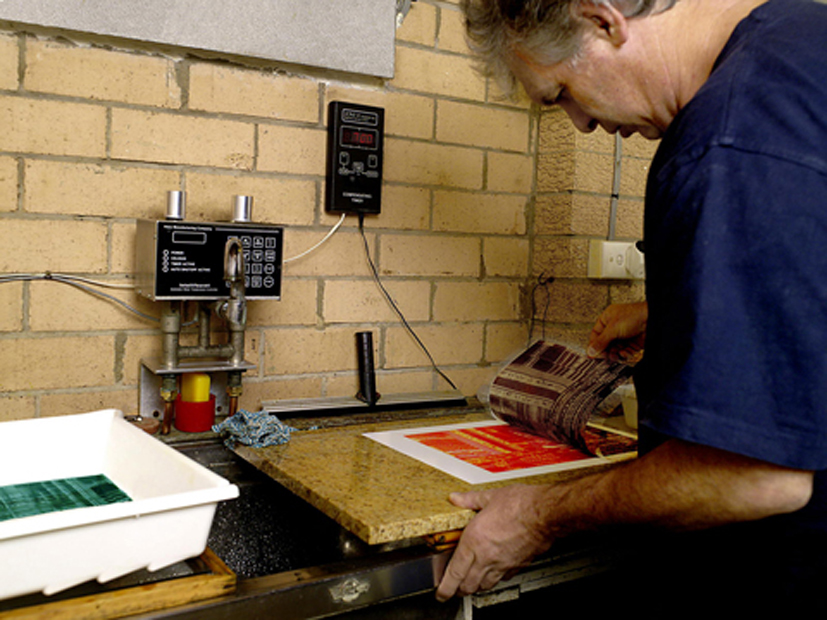
When the transfer time has elapsed the matrix can be removed from the paper and examined for evenness of transfer. There will be about one to two percent of dye retention in the matrix. Then the second most dye laden matrix can be rolled down in contact with the paper. See image #21. Finally the process is completed for the third colour. It is difficult to determine how the density and colour of the print is progressing as each colour is rolled down because it is being viewed through the silver deposit of the matrix as well. Only when the last matrix has been peeled off can the printer determine if they have blowen it. See image #22. Image #23 is the final print.
Nasty little surprises do happen. I recall once peeling off the last printer only to see a print that looked like I had taken the image with a grade 2 multi grade filter attached to the camera lens. I had forgotten to swing the grade two filter out of the light path of the enlarger when making the colour separation negatives. The only conciliation was that I had the process so well calibrated I got out exactly what I had dialed in.
Prior to 1991 Kodak still made Pan matrix film for making dye transfer prints from colour negatives. This material had to be handled in complete darkness. The colour negatives were enlarged directly onto three individual sheets of pan matrix film using red, green and blue light. After processing and washing off they were dyed up and the prints made. The other option is to make the separations directly from the subject using something like a one shot colour separation camera. See article Back to the Future .
This article is a greatly simplified explanation of how the dye transfer process actually works. I am sure if you have read this far you will be able to make more sense of all the literature that has been posted on the web about it. As you have already speculated these types of colour assembly processes are not something you attempt by using the trial and error method which is a manner of operation many photographers making silver gelatin silver and platinum photographs use.
Although this approach wastes a lot of materials it can be done because the number of variables a far fewer than the number involved in colour assembly printing. The only way in which these processes can be reliably carried out is to do the monotonous calibration work with step tablets and colour patch charts.
There have been very few books written on how to do this because just about every lab I have been visited has a different standard operating procedure or (SOP) for calibrating. However these procedures are no less time consuming than those used for creating a tri-colour carbon, tri-colour carbro, fresson or gum bi-chromate print . The numbers are different but the calibration process is remarkably similar.
These days I make the separations on a film recorder that has had all the tone curve corrections applied to the files before output. This equipment creates continuous tone negatives, no dots or pixels, using a pin registered back. The negatives are developed as if they were exposed under the enlarger. From that point on the process remains the same. This method saves about a day’s work. It also allows me to preview the results from the separation negatives using a specific dye set using the correct profiling. A luxury not available before digital.At the present time there is only one company manufacturing the essential matrix film. Filmotec Orwo in Germany is manufacturing film for Henke dye transfer. Whether Henke are willing to sell film or not is uncertain. But anyone interested in getting some of their work made in dye transfer can contact Henke Dye Transfer or Digital mask in NH.
All the other materials including the dye mixtures and paper preparation can be acquired by adapting other materials for purposes other than what they were designed.
I hope this article has been able to fill in the gaps relating to dye transfer printing that many people have quizzed me about.
More articles by Andy Cross can be seen here.
Next Post: Folio: Janet Naismith
Previous Post: Folio: Greg Wayn


Andy, thank you for this great article on the dye transfer process. I remember seeing Eliot Porter’s dye transfer prints at The Photographers’ Gallery in Melbourne in the 1970’s and was completely blown away by them.
More recently the work of William Eggleston has been on exhibition at the National Gallery of Victoria. Dye transfer is by far the best way to produce colour prints.
Amazing Andy
Great article I stumbled on. In the 1980s I went to Dr Porters home outside Santa Fe. He was then very old but I had the run of the workshop and could turn the pages of his many books and a gallery assistant could pull the original prints from their respective solander. I then went and workshopped as intern at Tartaro Lab in Manhattan where they produced a great deal of nations geographic exhibition prints and a deal of other artists. I met CTein and went also to the deSantos lab in LA. I made a number of prints of course. Bob Pace in Victorville Ca was possibly the most informative and generous. Then I set up a private lab in Melbourne using mostly Condit gear and a great deal of kit being discarded by the commercial print industry. My best separation negs made on Tmax 100 with pulsed xenon. The tartaro labs were amazing, projecting from negs to matrix film over 100 feet bouncing the light from large front coated rotating mirrors back and forth – so the light hitting the mat was as straight in beam and undistorted as they could make. They had big pocket clients and would make fifteen or twenty 20x24s and engaging in lengthy discussion with client before commissioning an edition. They also produced some wonderful images using multiple
Masked Cibachrome, but none of the print technicians liked it and as the stocks ran out, Frank retired. It is lovely to see some practitioners still keeping the flame of a most superb – perhaps the ultimate in analogue colour – still alive. Of course there’s some separation being done on repurposed Hell and Scitech drum scanners but I do suspect something is missing when tech has too much of a seat at the table.
Wow this is an amazing process I would love to understand better.
Your explanation is fantastic.
Thank you.
A really excellent article by Andy Cross! In my early days of photographic printing (by any method) I had longed to make Dye Transfer prints, having seen the wonderful, other-worldly beauty of prints by Eliot Porter and others. So I bought a how-to-do-it book and began to research into buying the matrix film, dyes and all the equipment necessary. Then Kodak pulled the plug, effectively killing the whole process. I no longer support Kodak for any of their products. So I turned to Cibachrome, long before it became Ilfochrome. I subscribed to a regular newsletter by LA-based professional printer Bob Pace, mentioned by Richard Butler. The newsletter was called Keeping Pace and Bob also published a few spiral-bound books (notably A Professional Approach to Cibachrome) on Cibachrome and masking. Masking was his thing. He insisted that to make a print from a transparency, the original must be masked by a Contrast Reducing Mask to overcome the inherently high contrast of Cibachrome papers. He also described Highlight Masks and Colour Isolation procedures. All these required precise registration tools, especially a film punch, pin-registered contact printing frame and a matching pin-registered negative carrier for the enlarger. I bought all these, including a custom-made carrier for my De Vere 504 enlarger from Warren Condit in Connecticut. I loved the resulting prints but never had the chance to compare them with Dye Transfer. I’m cursed: Cibachrome became Ilfochrome and eventually died too.
But the Condit tools and Bob Pace’s excellent manuals are used regularly to mask various negatives and 5×4 transparencies for silver gelatin and alternative printing. I make my own all-analogue enlarged negatives from 5×4 originals for use in platinum-palladium and chrysotype prints using these tools and masking methods. (Lynn Radeka produces an excellent book on many masking tools, many of which absolutely require pin-registering and sells his own registration carriers.)
So Dye Transfer never happened for me but reading Andy Cross’s excellent article and gazing at my own Eliot Porter print (Maple and Birch Trunks and Oak Leaves, Passaconway, NH) allows me to dream on what might have been.
Hi Robert,
You might still be able to get into DT. I believe Henke Dye transfer has gone out of business and are now selling off their matrix film that was made for them by Filmotec. Why not contact them and find out if film is still available. For all the other components there are work arounds. Visit Digital mask web site for the rest of the story.
I knew Bob and Mary pace very well. He taught me a lot about the process. I have a full set of the Keeping Pace newsletters. Still refer to them now and then.
I cut my teeth on Ciba as the color correction and contrast reduction masking is very similar. I think the condit equipment is better built than other systems. I knew warren and his son Audry well.
Glad you enjoyed the article.
Andy.