
Cleaning Films and Using Immersion Carriers by Andy Cross
Anyone who has worked in the darkroom will have at some point had to deal with dust specs and other debris on the surface of the films they are printing. Loose specs are relatively easy to remove with an anti-static brush or cloth.

These airborne dust specs are attracted to the film because of electric attraction. Which is why anti-static brushes and cloths are recommended. Another helpful addition is to fit an ionization unit. Mine has been installed into the air conditioner. This will ensure everything in the darkroom has the same charge making it a lot easier to prevent the airborne particles returning.
Having hepa filters fitted to the air conditioner if your darkroom has air con is also worth the money. In Queensland air conditioning isn’t a luxury it’s a necessity. These filters come in various efficacy levels. Both my units filter out the airborne particles down to 3 microns. About the same as those used in hospital operating rooms. If I get any particles on the films it’s what I brought into the room on my clothes or person.
Other deposits which have built up on the films over time due to improper storage or handling as well as insect and fungus damage are a lot more difficult to remove without damaging the films. Outlined in this article are some of the techniques I have learned in dealing with them.
One of the best film cleaning fluids ever produced was the Kodak film cleaner. I think Agfa also produced a product as well. Their main ingredient was Trichloroeathane. This compound, like many others of this type, were found to be ozone depleting and are no longer available. I found suitable replacements but unfortunately they are considered carcinogenic.
These compounds basically dissolve many organic deposits as well as grease from fingers that attracted debris to the films. They evaporated quickly from the film surface and left no residue. Another available product called Pec-12 film cleaning fluid I am told works reasonably well but haven’t tried it myself. The current Kodak film cleaning system is called P200. It is very expensive and would only be of interest to institutions cleaning a lot of films.
It was when I did a course in Boston on image conservation I became aware of a method of cleaning films that was under my nose the whole time. The ultrasonic bath.

These small units can be purchased for a few hundred dollars from most laboratory equipment suppliers. They can be filled with distilled water that has an appropriate amount of photoflow added to it.
It is important when using these units that the emulsion side of the films do not touch the metal interior of the bath or marks similar to a burn mark will often be seen on the surface of the film, which cannot be remedied. Depending on how imbedded the crud is in the emulsion the time necessary in the bath will vary. I have had to leave glass plates in the bath for a day before the debris could be removed with a soft sable brush.
A more aggressive approach is to fill the bath with petroleum naphtha also sold in Australia as Shellite. Sometimes referred to as petroleum ether even though it is not an ether. Like the now discontinued Kodak film cleaner it evaporates quickly, leaves no residue and won’t harm the film. This is also the only effective method of removing the deposits left behind on films that have been stored in the waxed paper type of film preservers. These treatments will often soften an emulsion and so some photographers immerse the films in a hardening bath after the treatment. There are various products that will do this. I won’t elaborate on what this process actually does to the gelatin but when dry will leave the emulsion less prone to scratching
One operation I have carried out for the last 30 years is to gold tone my B&W negatives. The solution usually referred to as GP or gold protective toner will encapsulate the silver grains in a protective film of gold chloride. This is the active ingredient in most GP toners. None of my negatives have ever displayed any signs of colloidal silver formation, silver sulphide stains or anything else. It is something worth considering for the longevity of the materials. Whilst on the subject of colloidal silver deposits I should mention what they actually look like.
Ever seen that silver plating effect when looking at the denser shadow areas of a print or the highlights of a negative ? It may even show some fine cracking in the surface, well that is probably colloidal silver. It can also show up as tiny orange specs, usually on prints, That too is colloidal silver. Although it may take some time, you can convert those deposits back into conventional silver, by soaking in a compound called Agfa Sistain. Although it’s not available anymore the active ingredient in it was Potassium Thiocyanate. The same solvent used in many gold protective toners.
As soon as a deposit tries to form it gets converted back to its original form by the presence of the thiocyanate salt. Which explains why the GP toners are so effective in creating a protective barrier for the negatives. Many photographers who selenium tone their prints will often run them through a Sistain bath afterwards. This essentially gives the print additional protection to silver grains that have not been converted to silver selinite.
After the debris has been removed you can inspect the films for the damage left behind by these deposits. Sometimes fungus will form on the films and although the ultrasonic method will detach the fungus from the surface, damage to the gelatin will often result. Another issue is that old negatives will often have scratches on either the back or front as well.
All these deformations in either the emulsion or on film base will usually show up in the print as black or white marks. The black marks will result from damage on the emulsion side, where the scratch is deep enough to remove silver. This results in an area of less density for the light to pass through creating a darker area on the photograph.
Scratches on the back will often show up as white marks. This happens because the films surface is roughened up which scatters light resulting in an area of less exposure which results in a light mark in the photograph. These are a lot easier to retouch than the dark regions which need to be bleached back first.
A far easier approach is to not print the defects in the first place. One effective way of achieving this is to use what’s known as a fluid immersion negative carrier. As the name suggests the film is immersed in a fluid whilst it is in the enlargers negative carrier. The science behind it is to fill in the areas of where there is surface damage with a fluid that has the same or very similar refractive index as the films base material. The fluids needed will vary depending on the type of plastic base the emulsion is coated on.
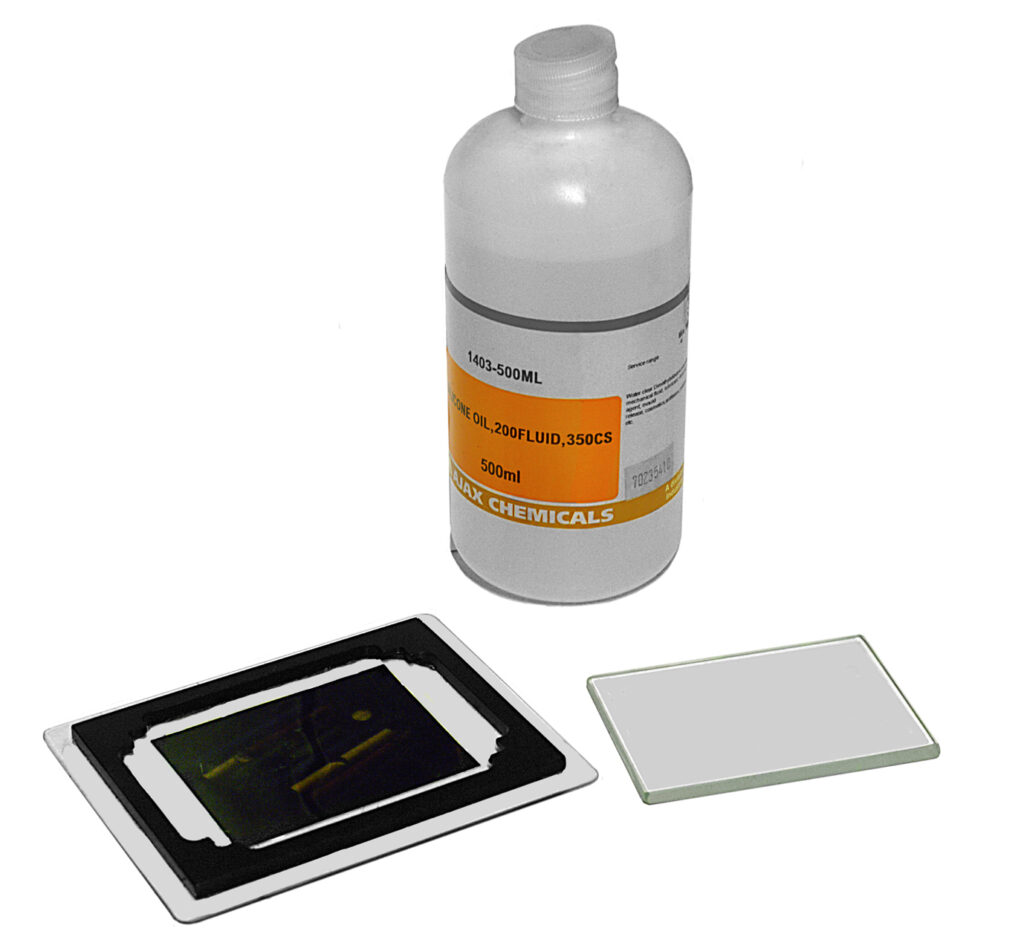
For polyester based films I use a silicone oil with a viscosity of 350. Most other films can be accommodated with either Aztek or Kami fluid. Some earlier Agfa films (Not Nitrate types) may require Decahydronaphthalene sold under the trade name of Decalin as a matching fluid.
Immersion negative carriers are not difficult to make but were made by companies such as Condit, Carlwen and Durst. There may have been others. You will need to source them used on sites like ebay. Another approach is to make one yourself. As can be seen in the illustration of the Condit immersion carrier it consists of a reservoir approximately 3mm to 4mm in height attached to the bottom glass of the negative carrier.

Obviously you will need the next largest size of negative carrier for the format needed in order to accommodate the reservoir and the cover glass. Most of them were made of black plexi glass or perspex. An ultraviolet activated glue like the type made by Loctite for gluing glass lens elements together is preferred.
Only one negative can be accommodated at a time so each image needs to be cut from its strip. There is a knack in using these negative carriers. It’s very easy to finish up with air bubbles in the fluid which will create their own signature in the print. First of all make sure the bottle of fluid has no bubbles in it. Then use a syringe to draw the fluid from the bottle and dispense it into the carrier. Any bubbles that do manage to get onto the glass can be removed with the syringe also.
First apply a tin coating of the fluid to the films surface with your finger. Then lay the negative into the pool of fluid from one end laying it down expelling air as it goes. Finally coat the cover glass with a thin smear of fluid and lower it into the carrier from one end as you did with the film. The weight of the cover glass should be heavy enough not to float. If possible use a multicoated negative carrier glass with another multicoated piece for the cover.
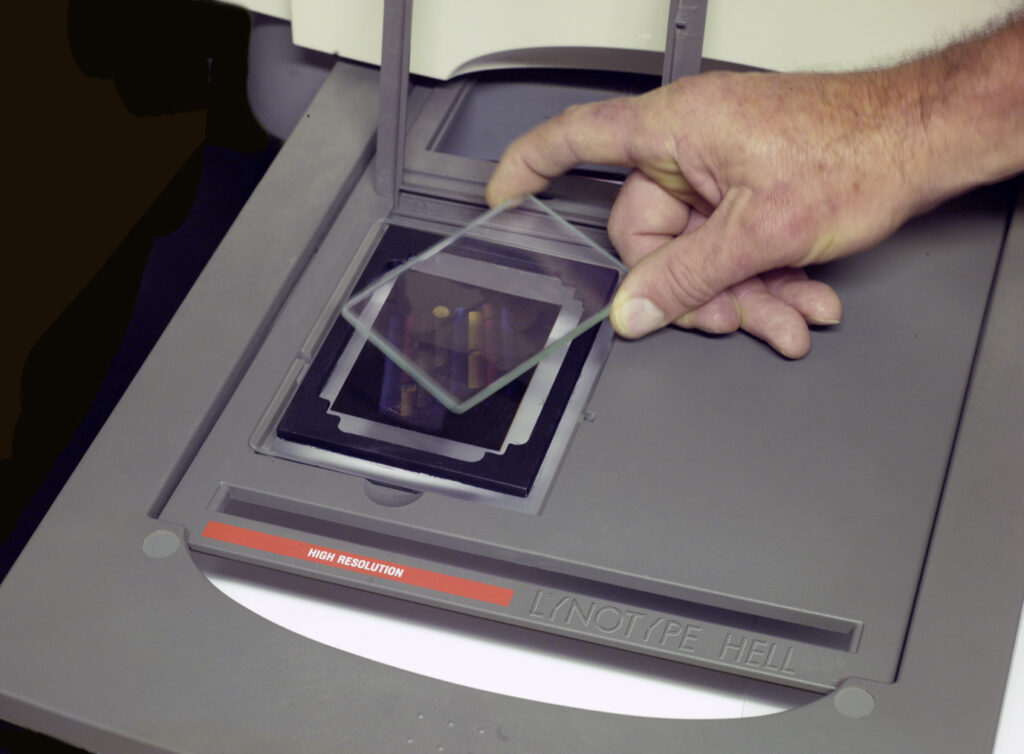
If you own a 4”x5” glassless film holder for your scanner you may find it will fit into the well of the scanner bed allowing you do make fluid immersion scans as well. Don’t confuse fluid immersion scanning with wet mount scanning. Wet mount scanning is a process to eliminate the likelihood of newtons rings occurring when operating a drum scanner when two smooth and shiny surfaces come into contact with one another. It was not to eliminate scratches and other minor surface defects from becoming part of the image.
Removing the immersion fluid can be an issue just as it is when cleaning it off after the wet mounting of a film on a drum scanner. The trick is no rubbing. I use three baths of warm water with photoflow added. The first bath removes the bulk of it. It is moved into a second bath and finally the third whilst agitating it in each one. Each bath is discarded after use. The films are then hung up to dry.
For more severe defects where emulsion has been removed the process of repairing them is called retouching. A process that takes years to learn in fact about the same time it takes to become a proficient photographer I reckon. Consequently I outsource any retouching required or I do it digitally and output the file on the film recorder.
I am sure the photographers reading this article will have their own pet methods of dealing with the various types of debris encountered on films. We would all be interested in knowing about them and I look forward to hearing their comments. In the past 48 years I have been involved with photography I have found the processes and techniques outlined here work well. I am sure they will for others also.


Hi Good Afternoon.
I was quite interested in ultrasonic cleaning of 35mm negatives.
After reading his interesting article, I only have one question left.
“#2 An ultra-sonic bath with a 35mm frame of film suspended by a film clip in a solution of Shellite. Ten minutes left it as clean as”
At what temperature did you use the machine during those 10 minutes?
Usually when cleaning negatives, the recommended temperatures are 20-25 ºC. However, these ultrasonic machines are usually used with the liquid quite hot, around 50-60ºC (too hot, I fear, for a 25mm negative).
I would be very grateful if you answer very question.
Thank you so much
The immersion temperature was 20 degrees C. At the end of the immersion time it had risen to 23 deg due to the energy from the ultrasonic unit.
Andy.
Fantastic Andy, thank you very much for your quick response. I apreciate it.
In the end, then, as I imagined, at a temperature like the one recommended for any 35mm negative washing.
Perfect, let’s see if I can get a piece of equipment at a good price and start testing.
Very thankful.